Skaarhoj Time Spin (XC8) controller
This controller requires the Skaarhoj I/O module to be loaded. Connect the controller to your network through its ethernet port and follow the "Raw Panel" instructions that come with the controller. Once properly configured VidBlaster will automatically detect the controller and initialise it.
Until Skaarhoj starts offering a VidBlaster edition of this controller you may want to cap some of the controller's buttons. This can be done quite easily using this (Word) template, transparent (overhead projector) sheets and a laser printer.
Controller buttons
1 2 3 4 5 6 7 8
If CAMS is active these buttons select the camera angle. If CLIPS is active this will load the selected clip from the current memory bank or, if in & out points are set, store the current clip in the selected memory. If you press and hold SHFT these buttons will select the memory bank.
CAMS
Press this unlabelled button (top-left) followed by 1 .. 8 to select the camera angle. Press and hold this button to select one of 8 playlists.
CLR
Used to clear items like in & out points, clips and playlists. Activate this function by pressing once.
CLIPS
Press this unlabelled button (below CAMS) followed by 1 .. 8 to select a clip memory. Press and hold this button to select a clip bank. In total there are 64 (8*8) clip memories available.
IN
Marks in point (again). Use SHFT > IN to go to the in point. Use CLR > IN to clear the in point.
LIVE
Returns all channels to live video. Any in & out points will be cleared, use SHFT > LIVE to keep the in & out points.
OUT
Marks out point (again). Use SHFT > OUT to go to the out point. Use CLR > OUT to clear the out point.
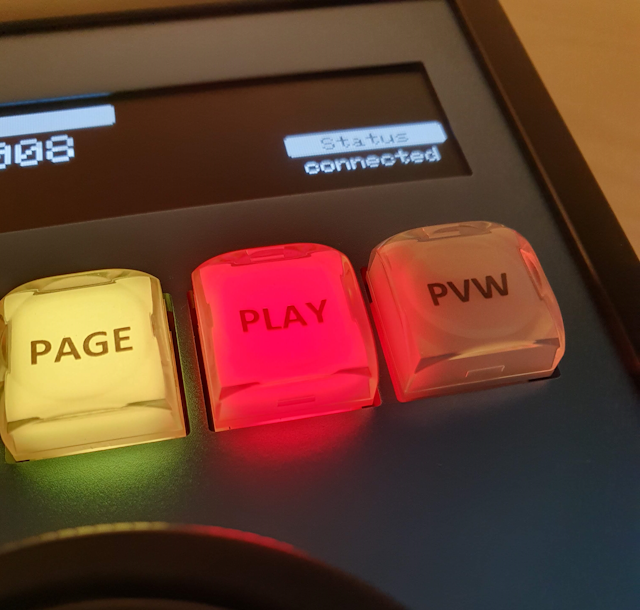
PLAY
Plays from current position at 100% speed.
PVW
Select preview mode. CLR > PVW will sync the preview timecode to the program timecode.
SHFT
Used to access secondary commands like go to in & out points. Activate this function by pressing once.
TAKE
Performs a take. Type and length of the transition is set in the replay module.
Note button colour codes are yellow or green to indicate availability and red to indicate activity.
Creating a direct Ethernet cable connection between controller and PC
Typically the controller will be connected to a network for local use, or to the internet for remote productions. For small productions or testing it may be preferable to connect the controller directly to the VidBlaster PC with a single Ethernet cable. Here's a brief reminder how this is done.
- The default setting for an Ethernet port is DHCP. If there is no DCHP server offering you an IP, a random self assigned IP in the 169.254.x.x range will be used. This is not very suitable in our case, as we want full control of the IP in order to be able to tell the controller where to connect to. Best thing to do here is to assign a static IP address for the port in the 192.168.x.x or 10.x.x.x range, e.g. 192.168.1.10.
- Either disable Windows firewall for the Ethernet port or create a firewall rule allowing communication with the controller.
Entering the IP address and port number in the controller
- First connect the controller to your PC via USB (firmware updates over the Ethernet cable are not supported).
- Download the Skaarhoj firmware updater.
- Select 'Online Configuration'.
- Select 'XC8-Raw Panel'.
- Verify the IP address and port correspond to what's shown in VidBlaster's Skaarhoj I/O module.
- Select 'Update Configuration/Firmware'.
- The controller will now restart and show that it is ready in RAW PANEL mode, which is what VidBlaster will be using. You can remove the USB cable.